Sunday 31 March 2013

How To Get Pink & Black Checkered Nails!

Hello! :)
I have another easy nail art design for you today; the other day I was playing around and came up with a relatively easy way of doing a checkered nails using one of my favourite colour combinations: pink & black!

Products I used:
 
The Colour Workshop Top Coat
(I also used a base coat and forgot to photograph it but they look exactly the same anyway! You can of course use whatever base and top coats you want to. A base coat is important to stop the colour staining your nails but a top coat isn't as essential but it helps the design last a bit longer! :)

Collection 2000 Hot Looks Fast Dry nail polish in "Siren"
Models Own Nail Art Pen in Black

First of all I applied 2 coats of the Collection 2000 pink nail polish to get a really opaque colour:

Then I used the nail art pen to draw black crosses on each nail using the long, thin brush (I think this actually looks like a cool design on it's own...maybe one day I'll just leave it as crosses on my nails because I think it looks quite interesting!
 
 
Then I just uesd the long thin brush again to fill in two sections of the cross. I've found that the squares at the top of the nail are easy to fill in whereas the squares at the bottom are slightly harder but as long as you take your time you can fill them in neatly!
And that's it! it looks pretty effective and you can do it with any different colour combinations (I also did white and black) and it looks interesting but doesn't take too many steps or products to achieve. The nail art pens take a while to dry but I think it's worth it! 
 
Thank you for reading! Hope you enjoyed my little mini tutorial! :) What are your favourite nail designs?
Libby x


Saturday 30 March 2013

*REVIEW*- Stila Smudge Stick Eyeliner (Bluefin & Peacock)

Hello! :)

I have another review for you today! This time is two of my favourite eyeliners ever! They are both the Stila Smudge Stick Waterproof Eye Liners, and the colours I have are Bluefin and Peacock.
 
PRICE & AVAILABILITY:
These are available from larger Boots and also online too, as well as any other places that stock Stila. They are pricey at £12-£14 depending where you get them, but these are one of the few makeup items I can justify buying at that price!

PIGMENTATION:
One of the main reasons I love these is the pigmentation. When I swatched them in Boots both times I bought these I couldn't resist once seeing how they swatched. They are both extremely pigmented and really beautiful colours.
 
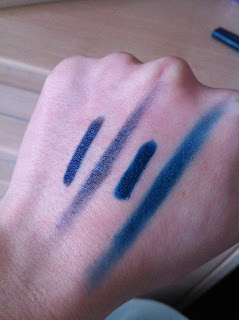
I swatched them and then also what they looked like blended out, the top two swatches is the shade Bluefin and the bottom two are Peacock.
 
Bluefin:
 This has a black base with dark blue shimmer and sparkles in it. I wasn't planning on buying it but when I saw it swatched I knew I needed to get it! It's such a unique colour and I love it to pieces!
Peacock:
This is a beautiful deep teal colour with plenty of shimmer. Really pigmented and it looks just beautiful on!
 
TEXTURE:
These go on really creamy and don't tug at the eyelid when you apply them. They glide on so easily but don't leave a harsh line as they blend really well. You can smudge them before they set because they're so creamy.

WEARABILIY:
These last really well which is another reason why I love them! You can smudge them for a bit but then once they've set they last around 12 hours really well. If you leave them ages they  can transfer slightly but that can be expected because they are so creamy and pigmented. For some reason the shade Bluefin doesn't last quite as well as peacock but they are still much better than the average liner!

OVERALL:
I LOVE these. Unique colours, creamy, blendable, last ages they are just perfect. I just wish they were cheaper, but I totally believe these are worth the price so next time if I see any that I love the colour of I might not be able to stop myself! The only other thing I'm not too keen on is the fact that these are twist up pencils, which some prefer as you don't need a sharpener but I've found these are far more delicate and break easily which isn't great when you pay that price tag!

Would I buy again?
Yes definitely!

Thank you for reading, I hope you enjoyed my review!
Libby x

Tuesday 26 March 2013

Make Up Empties! #1

Hello!
I decided to do a post based on my beauty empties for the first time today...as I think it says a lot whether you've bothered to finish a whole product!
Normally when I finish a product, I keep the packaging for a while so I can tell what I've used up. However recently I moved  house and did not want to take empty makeup products with me! I decided to take a photo of the products that I have used up completely, so I don't have to take them with me to clutter up a new house but I can still remember what I've used up!

I'll list all of the products and give you a run down of what I liked (or otherwise!) about them :) I'm generally working my way through from the left to the right, in case you want to match the product to the description!
 
1) Agatha Ruiz de la Prada Kiwi lip balm -
This is the yellow and green lip balm that you can see in the picture. I originally got this from Spain and although it took me a while to get through it (there was a lot in the tin!) I did really enjoy it. I didn't originally know the name but after a quick internet search I've found it along with a price that seems to be around $5. I didn't look very far but I didn't happen to see places that shipped it to the UK, but I'm sure if you're interested you can find it somewhere online.. This was the kiwi flavour and smelled amazing, but it didn't have a really overpowering scent. It kept my lips really well moisturised, hence why I used up every last bit!
Would I buy again? Yes probably, if it were a little easier to get a hold of!

2) Max Factor Glide And Define Masterpiece liquid eyeliner -
This was the first liquid eyeliner I had! (Well...actually it was my sisters but she gave it to me!) I've managed to find this online for around the £5 mark, but I haven't noticed it in many shops recently. This had a very soft sponge applicator and while this was nice for the delicate eye area it wasn't brilliant for creating a bold line. It worked well as a liquid liner, but it didn't have any amazing qualities that made it stand out for me.
Would I buy again? If I was out of liquid liner and happened to see it I might, but I wouldn't go out looking for it.

3) Too Faced Lash Injection Pinpoint Mascara -
The packaging of this seems to have changed slightly...looking online it seems to be a black tube with blue writing whereas mine had orange writing...unless I'm looking at a different one! :P I got this as part of a kit from Too Faced which had all sorts of products in it, although looking online this seems to retail for around £16 which is quite pricy. The thing I remember the most about this is that the wand was pretty small and clumped up easily, making it difficult to get separation in my lashes. I took this on holiday and I must admit even in heat and humidity it lasted well, and did give some volume but it just didn't separate very well. The small wand made it easy to be precise, but it didn't provide any great volume or length. It was an ok everyday mascara, but nothing special. This dried up pretty quickly but I'd pretty much finished it by then anyway. This had a smell to it which I can't quite pinpoint (kind of orangey... ? ) but I actually liked it in a weird way!
Would I buy again? No, I've had cheaper mascaras that have worked better. (Hi L'Oreal Voluminous :) )

4) Boots Eye Cream -
Not completely sure why this is in here as it's not make up... :P This is the white tube with the blue lid in the picture. I used this for a long time to moisturize my eye area before putting on concealer to stop it caking, and it worked well enough. it lasted a long time and it moisturised well. I remember this being very cheap, and I used in a long time ago when I didn't have as many moisturisers as I do now! :)
Would I Buy Again? Probably not as I don't have the need for it; now I use my moisturiser on my eye area, although I'm tempted to try out the Simple eye cream!

5) Miss Sporty So Clear Pressed Powder -
I have now hit pan on my second one of these...and I plan to buy another soon! I really like the formula of this as its light, keeps my skin feeling really soft and doesn't break me out. I recently did  a full review of this on my blog, which you can read *here*.  This costs around £3 and is such a good bargain!
Would I buy again? Definitely! I plan to pick up another backup one of these soon.

6) ELF Tone Correcting Concealer -
I bought this off the elf website a while back (www.eyeslipsface.co.uk) and while I remember liking It, the small tube vanished pretty quickly. My main issue was the packaging; the wand didn't reach the product stuck at the bottom so some was wasted. The concealer had ok coverage, but nothing special. I LOVED the smell of this (ELF uses the scent sugar orange in some of their products and I love it) but it didn't to anything amazing. I mainly used this to tone correct a concealer that was too light.
Would I buy again? Maybe as a backup concealer, but I wouldn't go especially looking for it.

7) Urban Decay Primer Potion (Original) -
I use up both a full sized and a mini version of this, and I still have one mini left. I do love this; it makes the shadows so much brighter and  they last ages. I love this product and would use it every day if it wasn't so expensive. I don't use this on an every day basis (I use just a base like the NYX one) so I don't need to keep on buying it because it lasts well, however I have no complaints for this product. Its a cult favourite and its easy to see why!
Would I buy again? Yes, I probably will at some point. :)

8) Max Factor Masterpiece High Definition Mascara -
This retails for around £7/£8 but I got a mini version free for spending a certain amount on Max Factor products. This does define very well, and I used to use it every day for school as it was subtle, but defined very well. Nowadays I'm a lot older and generally prefer more volume and length in a mascara and so now I don't think this would quite cut it as its more of a "my lashes but better" mascara.
Would I buy again? Probably not.

9) Barry M Crackle Effect Nail Polish (Black) -
I feel like this doesn't really need an introduction...most of us have owned this polish and tried the "crackle" trend at some point or another. I really loved the effect this gave any nail polish and it looked very pretty, but what annoys me about this is that I didn't actually use it up. After a couple of uses it turned gloopy and then eventually just dried out completely. I didn't use it that much before it came completely useless. It only costs around £4 so I guess its not a tragedy but even so it does bug me.
Would I buy again? I will...but only when I get around to it. I'm still not completely happy with it drying out but I do like the effect it gives.

10) Maybelline Dream Matte Mouse Foundation -
The pot of this you can see in the picture was actually my second pot of this, as I got through it quite quickly. This costs around £7/£8 but it does dry out quite quickly. It has light/medium coverage but I really liked the way it sat on the skin and it blended in really well. I haven't rebought it for a while but recently it  came to my mind again and I might repurchase it at some point, maybe as a foundation to use on school days as its quite light. My shade was 020 Cameo.
Would I buy again? I probably will when I remember!

11) Bobbi Brown Creamy Concealer in Porcelain:
This is a very thick, creamy concealer that I used to use for the under eyes. It used to actually be too light for my skin tone so I used to have to put something on top of it to correct it, but this wasn't too much of a problem. Now I have repurchased it in a shade that matches my skin tone (Warm ivory) but to be honest I've found better alternatives to this concealer. I will still use the one I have but for under eyes I prefer the Hard Candy Glamoflage and the MAC Studio Finish for blemishes. This one feels a bit too  creamy and does cake up a bit, but I still like it and it's nice to have for backup.  
Would I buy again? It's unlikely because I have another one at the moment, but if I ever finished that it is possible.

12) The Body Shop Divide And Multiply Mascara -
I'm pretty sure my version was a mini version and to be honest it was ages ago that I had this. I just kept the empty tube for a while. This was very similar to the Max Factor Mascara I mentioned earlier, but with a drier formula. It was good for an every day mascara, but these days I prefer something with more volume in it, and this just wouldn't match up any more to my expectations.
Would I buy again? No probably not.

13) Maybelline The Falsies Mascara -
I have found memories of this mascara, and I remember being genuinely quite gutted when it ran out. I liked the wand on this and it gave me good volume and length without clumping up. I have since coped without it  but looking at it now has reminded me of how much I liked it. And I liked the pink tube. ;) I think if I'm ever looking for a mascara that I KNOW I like I will come to this one. if I'm ever looking for something familiar that I know works this will definitely be my first choice. I do like to try out and experiment different mascaras meanwhile but I will keep note of this mascara to rebuy in the future. This cost around £7/£8 and is quite widely available.
Would I buy again? Most likely at some point, but maybe not straight away.

Phew! That was a llloooonnnngggg post! In the future when I do this they will be shorter; it was only this size because I had these products hanging around for a while!
Thanks for reading! What are your makeup / beauty empties?
Libby x

Monday 25 March 2013

How To Get Rid Of Under Eye Bags/Veins!


Hello! :)

One of the things I struggle with the most about my face is the fact that I have hereditary under eye veins/bags pretty much permanently. I have under eye bags, but then also the skin around my eye area is also quite delicate, thin and translucent, allowing all of my veins to show through (I tend to blame this on me being born too early…though I'm not sure I can give this as my excuse).

It’s always bugged me since I was a kid. Children can be pretty insensitive and there were always people saying “Why do you have veiny eyes?” :P I decided to do this post to hopefully give people some ideas about how to reduce under eye veins or bags!
 
 
These are my eyes on a "good" day, sometimes they are much more noticeable, though hopefully you can see the veins showing through, a bit of blue and darkness on the inner corner and also some puffiness. When a photo is concentrated like that may not look so bad but my eyes are very noticeable when you see my whole face.

UPDATE: I would just like to apologise in advance for the rather strange html things that keep appearing on this post...I've tried fixing it loads of times but it doesn't make any difference. The only thing I can think to do is type it all again but seeing as it already took me ages to type it the first time I don't really want to do that...so I'm sorry and I hope it doesn't disturb your reading too much! :)
 

Drink lots of water. This seems like an easy one, but it really makes a difference to your skin, hair and also your under eye area. I started drinking more water recently and not only noticed a huge difference in the brightness of my skin I also noticed less darkness on my under eye and less puffiness too. Most people seem to say that you should drink 8 glasses of water a day, but I generally drink out of water bottles so it’s hard to keep track of how many “glasses” that is. I think it varies from person to person too…I find that I forget to drink quite a lot (and then as a result I get a load of headaches) but now after trying hard to learn to drink more I now drink around 4/5 bottles in total. I drink a lot of tea too which also counts towards your daily fluid intake so it doesn’t just have to be water that counts.
 

Get plenty of sleep. Again, this seems stupid, but I’ve noticed that sometimes just an extra hour or even half an hour makes a lot of difference. My eyes are a lot less puffy by the morning and there is a lot less darkness underneath. The amount of sleep you need also varies between people at different ages and stages in their life, so you can adapt the amount you sleep to what you need and what is practical. Obviously most people won’t be able to get 12 hours sleep each night but generally I notice my under eye bags getting a lot worse if i get less than 7 ½ hours’ sleep.


Fix nasal congestion. I’ve noticed this really increases the severity of my  under eye puffiness so if your nose is blocked it really makes a difference. If it is because of allergies you can take something like Piriton or other allergy tablets. You can also get medication to help with congestion if you have a cold or flu.


Reduce salt intake. This isn’t something I’ve made a huge effort to fix really but after doing some research I’ve found out that it can cause circulation problems if you have too much salt and this causes the blood vessels to dilate, increasing the appearance of under eye circles and veins. Apparently also salt can cause water retention which will then cause puffiness under the eyes.

Some causes of under eye circles and veins are simply hereditary, and so sometimes there is only so much you can do to reduce them. In that case...there are some ways you can help hide them or disguise them…however I will start a separate paragraph for this!
I recently did a blog post on the *best high coverageconcealers*, so I’d suggest that you read that if you want to find out more about some good high coverage concealers.
For the best under eye concealer, you want one that is ideally just a shade or two lighter than your skin tone to highlight the area, however if its too light it will draw attention to the problem even more by making you look pasty. A concealer that is too dark for your skin tone will also not help, as it will increase the appearance of under eye shadows.
A primer is really essential if you want he under eye concealer to last all day and hopefully not crease as much. The best one I’ve come across is the Too Faced Primed And Poreless primer, as it makes the concealer last so much longer.
You also need a lightweight, brightening under eye powder to keep the concealer lasting but not creasing; ideally this needs to be a very fine powder to reduce the chance of concealer caking up. One that I have really liked is the ELF HD Under Eye Powder as it sets the concealer well but is a very pale pink colour that is very brightening. Mattifying the under eye area also helps as any shininess will draw a load of attention to the area.
Now onto concealers….the best one I’ve found and have been using for a while now  is the Hard Candy Glamoflage Concealer. It is VERY high coverage (it can cover tattoos if you layer it on) and although it is quite thick and can be drying, as long as you blend it out and make sure you under eye area is moisturised it is fine. If you want something lighter I’d recommend the MAC Select Cover Up Concealer which is a very lightweight liquid that has very good coverage. Also if your under eye circles are blue toned, a good trick is to use a salmon/orange toned concealer (maybe like the Benefit Erase Paste which also works quite well as its very creamy) it really helps to counteract the blue tones.
Well that’s about it! I hope this was useful to any other people similar to me who are struggling with under eye veins and bags! Thanks for reading!
Libby x
Sunday 24 March 2013

*REVIEW* ELF Shimmering Facial Whip in Spotlight

Hi!
This morning I have another review for you...this time it's the ELF shimmering Facial Whip and the shade that I have is spotlight.


 PRICE AND AVAILABILIY:
These are available from the ELF website for the UK (www.eyeslipsface.co.uk) (or www.eyeslipsface.com if you're not in the UK). I have also stumbled across certain ELF products n TK maxx occasionally but they've usually been the palettes. These cost £1.50, which is a great bargain! They come in a load of different shades that you could use as a blush, but this shade is a highlighter shade.

TEXTURE:
I won't lie. The texture of these is odd. Mine is extremely running and unless you shake it well you just end up with a  load of water that doesn't have any shimmer in it at all but then occasional big gloops of glitter...it's a little bit strange and because of that I've found the best way to apply these is to shake it, squirt some onto my hand blend it in with my finger and then use a brush to apply it on my face, however you have to be very gentle because the product is so watery before now it has actually done something similar to washing my foundation off underneath. Which isn't great.
Here it is when you first squirt it on in one big watery blob..
As you start to blend it out you can see just how watery it is, but because I've shaken it there is some shimmer at least...
And then when it's blended out well enough it sits ok on the skin (as long as you haven't "washed" away your foundation with this...)
 

PIGMENTATION:
The swatch above doesn't show it too well (hurray for bad lighting...) but this product is actually very shimmery. It is definitely a white shimmer, so if you have a darker skin tone it may look a little frosty and it doesn't have the pink undertone that Benefit's High Beam has, but it has a lot more shimmer that that. As long as you blend it, the shimmer isn't too in your face and it actually works pretty well.

Overall:
Overall this is pretty good for the price...I just wish it wasn't so watery as its quite hard to work with without smearing your foundation underneath! It is a very cheap product which is one of the benefits of it, and the colour works well for me because I'm pale, however I can't help but feel that there may be better yet still cheap highlighters out there. In saying that, I do have a certain fondness for this product and I do wear it quite often.... eg on days when I want a highlight but not to use up one of my mini Benefit High Beam's which are expensive!

Would I buy again? Probably not...however I will be happy to use up this product. If I buy again I'd maybe buy a blush colour but I'm not sure yet.

Thank you for reading! Hope you enjoyed my review :)
Libby x


Saturday 23 March 2013

How To Get Colourful Panda Nails! :)

Hello :)
Today I have a nail look that is a little more intricate!
I was thinking about what to paint on my nails earlier today and remembered a panda design I did a while back...however this time I decided to make it a bit more colourful!
I thought I'd do a blog post on how to get this look, in case there are any other panda lovers out there! ;)

I used quite a lot of different products for this look, but you could easily switch it up to make the colours the way you want or to use the products you have :)

Step 1) BASE COAT! I'm using a lot of colourful polishes as the base for this look so it's always a good idea to use a base coat to stop the colours staining your nails...I've had a greenish tinge to mine before now where I forgot to use a base coat and it took ages to grow out. I'm just using a base coat I think from the Colour Workshop Nail Parade kit which had loads of different polishes in it.

Step 2) Paint your nails in whichever colours you want to be the background colours; I wanted bright colours and so I chose these:
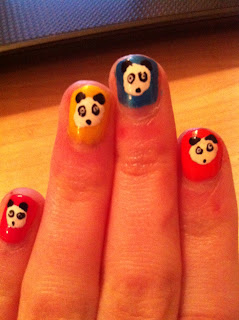
I used these 5 colours to paint my nails, from left to right they are: Collection 2000 Hot Looks Fast Dry in Go Retro!, then Bright Lights, then Show Off, then the yellow is a Ruby & Millie nail polish in Yellow, then another Collection 2000 Hot Looks in Siren.
I used about 2 coats for each one to make sure it was opaque and bold.

Step 3)  Draw the basis for the panda's face; a large white spot.
You can use any plain white nail polish but since they aren't too easy to find I used a Claire's Accessories nail tip whitener instead to get a matte white polish.
 
You can go over it a couple of times to get it opaque :)

Step 4) Use black and white nail art pens to draw on the details of the panda. I'm using the Models Own nail art pens in black and white. Alternatively if you don't have any pens and don't want to buy one, you could use a nail brush or a long, thin fairly stiff brush to dip into black and white polishes that you already have, though I've found this harder.

I just have to pause for a moment to show you the amazing packaging on these...

First you use the black to draw on little circles for the ears:
Then you draw on the black dots for the fur around the eyes:
Then a black dot for the nose:
Then a smaller white circle inside the black circles for the eyes (you have to be pretty precise here):
And then finally you have to do a *tiny* little dot inside those white dots for the pupils...
And that's the whole thing! It's very time consuming but it's not too difficult and I find it looks so cute when its done! :)
You can of course use whatever base colours you want, or just have a clear coat underneath if you want.
I really love the way this turned out, last time I simply did the pandas over a clear polish, but I love the colourful effect of the background colours and it looks so bright!
I hope you enjoyed my little tutorial, it was really fun to do and it's not too hard - I'm not the most skilled person at nail art! I find it difficult because my hands are small and so I don't have much nail space, but I can manage this ok :)

Thank you for reading! I'll hopefully do more nail art designs in the future!
Libby x

Thursday 21 March 2013

NOTD: Galaxy (21/03/2013)

Hi! :) I have a Nail Of The Day for you this afternoon...
I was playing around with my nail polishes the other weekend and came up with this combination, which I really love!
 
I used two nail polishes:
The one on the left is the Models Own nail polish in Ibiza Mix ( a super glittery polish!) and the one on the left is one a friend gave me a while ago...the Paul & Joe Nail enamel in 005 which is a faded black/very dark grey colour with some sparkle in it.
 
First I applied one coat (two on certain nails where I didn't have enough the first time) of the Paul & Joe Nail enamel....
I just LOVE the bottle of this..it's so pretty it deserved it's own photo...


Please excuse the dodgy painting job...Got a cold today and not feeling up to spending hours doing my nails perfectly! :)
I then layered the Models Own nail polish on top...
I LOVE the way this turns out...this polish is a PAIN to get off again, but it looks so pretty!
 
 
 I love the Paul & Joe polish on it's own..but I'm definitely a fan of bright/interesting nails and I think the chunks of glitter look so pretty! It kind of reminds me of a galaxy with loads of stars in it... :)
The Models Own polish does smell quite a bit...but because of how pretty it looks I can forgive it!
I tried to get a good photos to show what the combination really looks like but the lighting is so bad today! It's really rainy and cold :(
 
 
Hope you liked my NOTD! :) It says a lot that I've gone back and redone this nail look, I get bored of nail polishes quite easily!

Thanks for reading!
Libby x

Wednesday 20 March 2013

*REVIEW* - Collection 2000 Glam Crystals

Hello :) Sorry for the absence lately..but I have a review for you today...
These are the Glam Crystals glitter liners from Collection 2000 that I stumbled across one day in Tescos and have since bought more!

I now own 4 of these liners... the colours are (from top to bottom) Dig it (15), Dancing Queen (8), Shake It Up (11) and Funk (3).
PRICE AND AVAILABILITY:
These all cost around £3 and Collection 2000 is available pretty much everywhere...in most big supermarkets, Boots and Superdrug. This price is pretty great and one the reasons I have been back to get more of these liners!

PIGMENTATION:


It was pretty hard to get decent photos of these as the lighting wasn't too good...

They are in order of the second picture (left to right): Dig It, Dancing Queen, Shake It Up, and Funk.

Dig It: Probably the most unique and easiest to wear as this is a black base with gold sparkle in it; it makes a really nice change from a normal old black liner on the top lash line! :) There are different sized chunks of glitter in this one but I really love it, it's really pigmented and comes off well in one swipe (as do all of these to be fair.) This is my favourite in terms of the colour.

Dancing Queen: This is the first liner I got, this looks amazing put on top of a matte pink liner. This is  a pink base with purple, blue, gold, pink and goodness knows what else in there. This is again really pigmented and looks really bright and interesting because of the different colour glitter in there.

Shake It Up: Another one of my favourites! This is a purple base with blue, green, silver, red, and purple glitter in there. It looks really great lined over a black base...Again...very pigmented.

Funk: This the best gold liner I've tried! Most of the others I've tried/swatched are patchy and weird. This one has as slightly different texture and seems to have slightly finer pieces of glitter so it's less chunky and seems to go on smoother with less gaps where there isn't as much glitter.

TEXTURE:
There isn't a huge amount I can say about texture for theses...as expected with glitter liners they feel slightly gritty and chunky (with the possible exception of Funk) but this doesn't bother me and to be honest what can you expect from a liner that is packed with glitter?? These are so pretty and I don't have any problems with the texture.

WEARABILITY:
These will last around 8 hours on me but I will loose a little bit of glitter in that time, mainly on the inner corner where I tend to rub my eyes more..(must stop doing that...) however these aren't incredibly long wearing...I have ended up with a small amount of glitter on my face but I'm not too bothered about that. These also remove really easily for anyone who has a hard time removing eye makeup well.

OVERALL:
I really like these! (I hope you can tell seeing as I've gone back and ended up with 4!) my favourite colours are Dig It and Shake It Up, as they are really pretty and quite unique. I mainly love these because of how packed with glitter they are and they are really pigmented. I've tried other liners that just end up a clear gel base with the occasional bit of glitter..you can really easily see the base colour of each liner with these.

Would I buy again? Yes definitely.

Thank you for reading! I hope you enjoyed my review!
Libby x

Tuesday 12 March 2013

*REVIEW* - MUA Liquid Eyeliners

Hello :) I have a review for you this afternoon...

Today I'm reviewing the MUA Liquid Eyeliners, of which I have currently 3 shades.

(from top) Shade 2, Shade 5 and Shade 3
 
 
PRICE AND AVAILABILITY:
These all currently cost £1 from some of the bigger Superdrug shops that stock MUA. You can now also buy MUA products from their website (http://www.muastore.co.uk/). I don't think you can beat that price even for drugstore products! :)

PACKAGING AND BRUSH:
I will admit this...the packaging isn't that great. However for the £1 price tag you can't complain that much really. The packaging is simply a little pot with a very tall want for all of the shades, but the long handle doesn't screw into the pot very well and it feels quite flimsy. Especially on my black liner (Shade 5) the packaging feels quite delicate and that I feel it may break at some point because the brush doesn't screw too well into the pot.
The sizes of the brushes of these tend to vary slightly in these liners...

 
For the black liner (Shade 5) and the electric blue shade (Shade 2) the brush is fairly thin, stiff and quite small, however for the bronze shade that I have (Shade 3) the brush seems to be actually like a sponge, and it is quite a bit larger:

I'm not 100% sure why the brushes vary, but it does mean that you can't get such a thin, precise line with this shade but that's not too much of a problem.

COLOUR AND PIGMENTATION:
Swatches from top: Shade 2, Shade 5, Shade 3.

Shade 2 is a bright, electric blue that adds such a fun pop of colour. This is one of the most unique liners I have at the moment :)
Shade 5 is your everyday standard black liner, it's a nice deep black with no shimmer.
Shade 3 is also pretty unique, ad is a mid-toned bronze with shimmer. With the different brush tends to apply a bit too much product sometimes (although the swatch above was a bit of bad luck) but if you go back over it , the colour blends out and doesn't appear as thick as it does in the swatch above.

All of these shades are nicely pigmented and I have no complaints about the colour payoff :)

WEARABILITY:
These generally last quite well on the lid providing you leave them alone...I find that if at any point during the day I rub my eyes slightly the liner crackles and does come off a bit...and also if they get wet they crackle too. They are easy to remove however, and for a normal day I don't have problems with them fading, but like I said they can crack and fall off in little bits if you don't leave them alone.

OVERALL:
Generally for the price, these liners are pretty amazing! You can't get much more of a budget price for makeup than £1, and for everyday use these are very good. There are quite a few more colours that I'm interested in picking up, as the price means you can pick up a few at a time ;)

Would I buy again?
Yes, definitely.

Thank you for reading! I hope you enjoyed my review!
Libby x